Before you begin
QuickReports is a powerful tool that can generate customisable reports to assist you with your practice analysis. It allows you to retrieve records from Genie including patients, procedures and billing, then report on various aspects of them. Reports can be printed or exported to Microsoft Excel for further analysis.
While QuickReports are a valuable tool to incorporate in your practice, they can be confusing to navigate if you have never ventured into this area of Genie before.
To ensure Genie can find the right records for your report, you will need to determine how Genie would distinguish these records in your data. All pieces of data in Genie are stored in tables, similar to tables you would find in a spreadsheet. Each table has different fields which will tell us different information.
Your searches and reports will only be as accurate as your data entry. If your health funds, current problems, procedure names, etc. aren't consistent across your database, you may not capture all the information you want in your reports.
1. Determine your report table
Before you can create a query, you must firstly determine what exactly you are searching for. You may want a list of patients, however, depending on the information you're after, this list might need to be found using a different table in Genie.
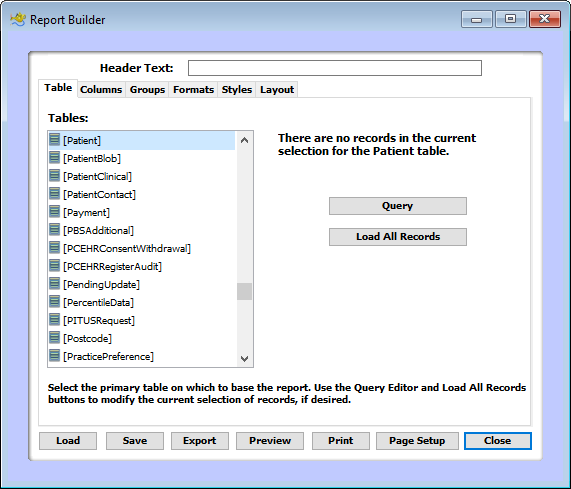
Navigate to File > QuickReports - this will open the Table tab of the Report Builder window as shown below.
Commonly Used Tables
You will need to find the table you are querying in the list on the left as shown above. A few tables that are commonly used are:
| [Appt] | You can use this table to query everything regarding your appointments in Genie.
Note: Your Appts > Appt Preferences for deleted patient appointments may affect the accuracy of this search if you are querying historical appointments.
 |
| [Consult] | You can use this table to query your patient consultation notes in Genie, including queries on the consult date, Diagnosis, Examination, History and Plan fields. |
| [DownloadedResult] | You can use this table to query your pathology & radiology results including test names, abnormal results and laboratory information. |
| [Patient] | You can use this table to query on patient data in Genie including Account Types, ATSI status, health funds, referring doctors, postcodes, etc. |
| [PatientClinical] | As of Genie v9.3.6, fields originally in the [Patient] table have transferred over to the [PatientClinical] table as part of the locked record work.
You can use this table to query on a patient's clinical information such as diabetes status, family history, smoking / alcohol info, and flag status / reason. |
| [Payment] | You can use this table to query all of the payments in your Genie database. This and the [Sale] table can be used outside of the Billing vs Income Report to develop a more complex and custom report. |
| [Procedures] | You can use this table to query all of your patient procedures in Genie. This search can be specified depending on post-op information, procedure name, procedure type, hospital and assistant / anaesthetist. |
| [Sale] | You can use this table to query all of the sales in your Genie database. This can be specified depending on certain item numbers, service date, inpatient services, fee and patient details. |
Example Report
"I want to find all patients over 25 that have had a consultation in the past 6 months with Dr Demo."
For this example, while we want to find a list of patients, this list is determined on if they have had a consultation or not, therefore, the search will need to be performed on the [Consult] table.
2. Create your query
Now that you have determined what table you wish to search on, we will need to create the query.
To view all records in a particular table, click the  button. This can also be used as a starting reference to gauge how many records your query eliminates.
When you are ready to run your query, hit the  button. This will open the Query Editor.
In this window you will need to choose a specific field in your chosen table, then use your comparisons and values to complete your query.
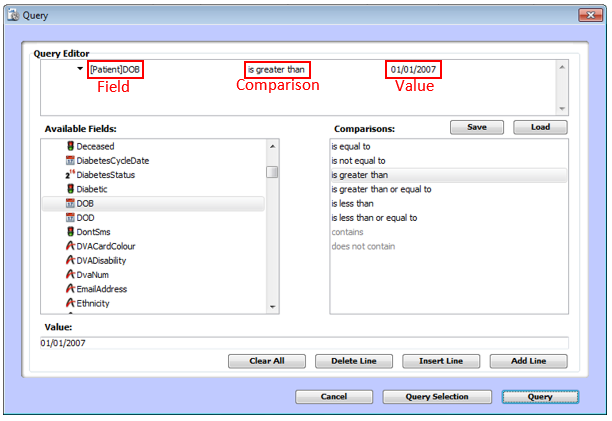
The four parts of your query
|
| And / Or / Except | Available Field | Comparison | Value |
See the Example Report section below to see how these all come together.
Adding lines to your query
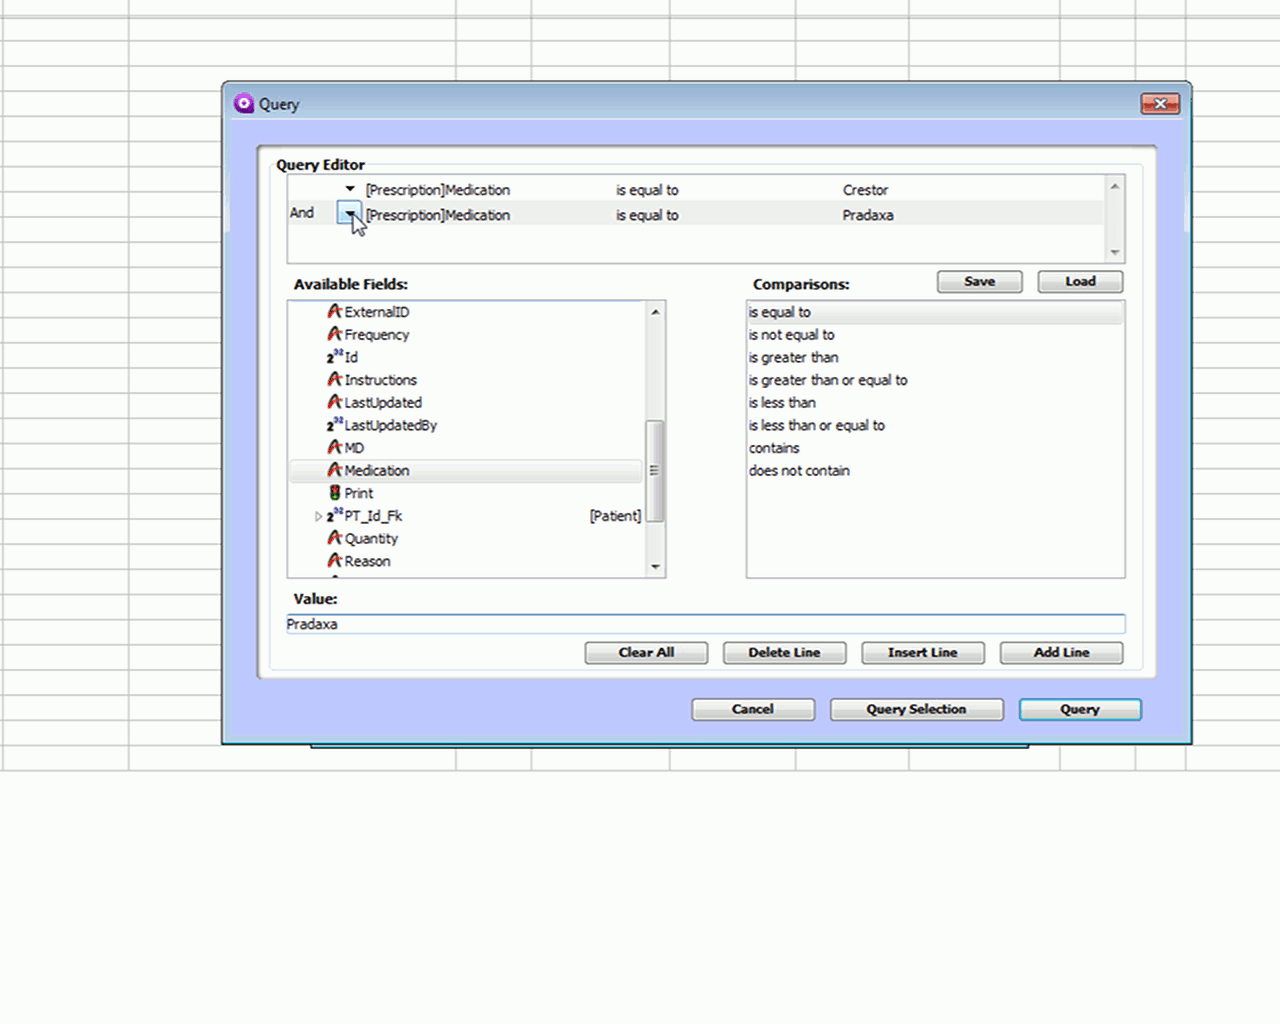
To create a multi-line query, simply click the  button within the Query Editor.
Changing the relationship - and / or / except
If you need to change the relationship between your query lines (e.g. if you want to find patients that have been prescribed either X or Y), change the relationship on the left-hand side of the Query Editor.
Once you have added in your lines, click  and you will be returned to the main Report Builder window.
You will then see how many records your query has produced in the top-right of this window:

Example Report
"I want to find all patients over 25 that have had a consultation in the past 6 months with Dr Demo."
With this report, we want to find a report that is based on three separate query lines:
- Patients with consultation records in the past 6 months;
[Consult]ConsultDate is greater than or equal to DD/MM/YYYY - Patients with consultation records linked to Dr Demo; and
[Consult]DoctorName is equal to XXX - Patients over the age of 25.
[Patient]Age is greater than or equal to 25

How do you access the [Patient] table when you're querying on the [Consult] table?
You can find and open the [Patient] table within the current table in the Available Fields area:

You can usually access the [Patient] table within the majority of tables in Genie.
3. Add your report columns
After completing your query, you then need to tell Genie what information you want to be shown in your report.
Navigate to the Columns tab of the Report Builder where we can do the following:
- Add a field - double-click on the field in the Database Fields list
- Remove a field - click and drag the field from Report Columns back into Database Fields
- Reorder a field - click and drag the field to its new location in the Report Columns area
Each field in the Database Fields has a corresponding icon, indicating the type of information that field contains. The field types are:
 | Text |
 | Number |
 | Yes / No or radio box |
 | Date |
 | Long text field (e.g. Family History) |
If you are planning to export your report to Excel, we recommend not using Long text fields (e.g. Family History, Full Address, etc.) as these contain carriage returns and may cause the exported data to display incorrectly.
Example Report
"I want to find all patients over 25 that have had a consultation in the past 6 months with Dr Demo."
The fields you want to add are completely up to you! For this particular example, some relevant fields may be:
- [Consult]ConsultDate
- [Patient]FullName
- [Patient]Age
- [Patient]EmailAddress
- [Patient]MobilePhone
4. Format your report
The last four tabs in the Report Builder window are optional, but they allow you to format your report in the following ways:
Groups
In this tab you can group your column data and choose to sort your report by a particular field (e.g. Surname). You can also choose to show group subtotals and grand totals.
Formats
In this tab you can change the name of the column title, as well as change the format of the field (e.g. for monetary fields). You can also choose how you want to add up your subtotals by choosing: Sum, Average, Min, Max, or Count.
Styles
This is where you can choose the colour and styling of the report if you choose to print it instead of export it.
Layout
You can add a watermark to the printed report such as Confidential or Draft. You can create your own watermark by creating a new "Report Watermarks" folder in your Genie folder and adding your watermark in there.
5. Export / Print the report
You can then generate the report in one of three ways, using the corresponding buttons at the bottom of the Report Builder window:

Export
If you would like to manipulate or edit the data in a certain way (e.g. additional sorting, calculations, etc.), you can export the report as an Excel spreadsheet. Simply click Export and choose the 'EXCEL Spreadsheet' option.
When Genie tries to open the saved Excel file, click Yes to the prompt that the file format and extension don't match to open the file.
You can also export the report into an ASCII (a tab delimited text file) or HTML file.
Preview
This will open the report directly on your computer, rather than physically printing it. If the report is quite large this may be a good option to ensure that it is constructed correctly and you are not wasting paper.
Print
This physically prints the report to a printer of your choosing. If you are using a Mac computer or have a PDF printer installed, you can also choose to print to PDF and save this to your machine.
If your report has a lot of columns, it may not fit a portrait sheet of paper. You can change the Page Setup in the printer dialogue box to change to landscape orientation, otherwise you may need to export the report to an Excel spreadsheet instead.
6. Save / load queries and report templates
If you plan to run a search or report often, you may like to save them to use again later. You can choose to save your query and/or your reporting template with your columns and formatting.
Saving your query
To save a query, go to File > QuickReports and perform the following steps:
- Highlight the appropriate table in the Report Builder window to base your query on;
- Click the
 button to open the Query Editor;
 - Build your report as per the above "Creating your query" section;
- Before clicking the
 button, click the
  button above the Comparisons. This will give you the option to save your query on your local computer as an XML file.
Loading your query
To load a query, go to File > QuickReports and perform the following steps:
- Highlight the appropriate table in the Report Builder window that you based your saved query on;
- Click the
 button to open the Query Editor;
 - Once the editor is open, click the
 button, then locate the saved XML file on your machine.
Saving your report template
To save a report template, load in all your columns, groups and formatting in your Report Builder window. Once you are happy with these, click the  button and choose a name for your report.
Loading your report template
To load a previously saved report template, you simply need to click on the  button within your Report Builder window.
You can load a previously saved report template, adjust the columns/formatting slightly to suit the current report you are creating, then save as a brand new template!