Before you begin
Before printing labels from Genie you will need to ensure your printer is set up to work with the computer you are on and this printer has been selected as your label printer in Genie's Printing Preferences. Labels an be printed either as a sheet (Avery 7 x 2) or individually using a Dymo LabelWriter.
Printing labels
Labels can be printed from various windows within Genie, including the Appointment Book, Patient List, Account Holder List , Address Book and Patient Demographics. To print a label, click the  Label button in any one of these windows.
When printing labels from the Patient, Account Holder or Address Book lists, ensure you are only highlighting the desired record/s and then navigate to Records > Use Selected. If this step is not performed, Genie will attempt to print labels for every record in the list.
Clicking on the  Label button with a patient selected in one of the above windows will cause a drop-down menu to appear. This menu will have the option Built-in Labels and any other templates you have ticked Display in List for. You can use Genie's Built-in Labels for Avery 7 x 2 or Dymo Labels.
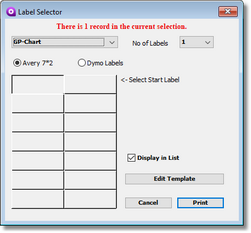
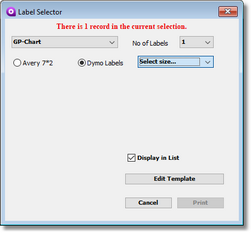
Select the best suited label from the drop-down list at the top of this window, and select the relevant radio button out of Avery 7 x 2 or Dymo Labels. If you are using Dymo labels, ensure you have your Dymo printer selected for the Labels entry in your Printing Preferences (File > Printing Preferences).
You are able to print up to 14 labels at a time by using the No of Labels drop-down menu. If you are using Avery labels, select your starting label by indenting it on the table in left. If you are using Dymo labels, select the correct size from the Select size.. drop-down menu.
Printing Referral Letter address labels
Within Referral Reply  letters, you have ability to print out address book labels for your recipients.
- For the addressee, click the Addressee Label button
 to access the label printer and produce an address label for the doctor.
 - For a CC, right click on the CC’s name in the CC table in the upper left of the window and select Print Label to access the label printer.
- For the patient, click the Patient Label button
 to access the label printer and produce an address label for the patient.
Editing labels (v9 and below only)
If you're running Genie v10 or above and wish to edit labels, the Edit Template button is no longer available and you'll need to create a custom label – please refer to the Merged Letters as Labels article for further information.
If you find that your labels are printing outside of the margins, use the Edit Template button to open the 'Edit Form' window and adjust them accordingly. If you would like to adjust the entire label template, click and drag the mouse over the whole label template to highlight it, releasing the mouse once you have covered the template. The invisible references will now be visible.
If you open the Edit Form window via the Edit Template button, you may find that the label itself doesn't appear. You will need to resize or maximise the window so that Genie has enough space to display the label template.
You can nudge all fields left, right, up and down by pressing the arrow keys on your keyboard. You can save these changes by clicking the Floppy Disk button at the top and closing out of this Edit Template window.
You can also adjust the size of fonts on your labels by clicking on the field, then manually changing the font size in the Property List on the right. Once you save the label template this will update the font size for all future labels for all templates.
Once you have configured your labels, click on the Print button.
Display in List will add the selected label to the label drop-down menu so that this window can be bypassed in future. You will not be able to select starting label or number of labels if you print directly from the label icon.
Legacy labels
Reading through the information above, you might find that the labels and features being described don't match the ones you usually print. Perhaps you're not used to seeing the Label Selector window, or the information that prints on your labels is different to the information available in Genie's inbuilt templates.
It's possible you are using Genie's legacy label functionality. Before the Label Selector and the current templates, Genie handled labels very differently, storing the templates as customised files on your computer itself, loading these up whenever they are needed. The window/preferences for these labels can be accessed by holding the Alt/Option key when clicking the label icon  and selecting Built-in Labels.
If you've had these configured for some time, these will still work, but we recommend using the more modern label functionality where possible. As a legacy feature, these older labels aren't something we are able to provide extensive support for. If you find that Genie's current label templates aren't what you need, you should consider using Merged Letters as Labels as a flexible and reliable alternative.